|
|
||||||
 |
||||||
| < Previous | Building Ice Racing Tires (Stephen Jones) |
Next > | ||||
This section of the VermontRacing.com web site is for the other way that I learned... installing ice racing screws from the outside. TIRES First, you need to get a set of tires. You want tires with tread, believe it or not. If you can guarantee your car that you will only be racing on ice, then you wouldn't need tread. But, most of the time that I have done Ice Time Trails there has been snow on the lake. Snow and no tread do not mix. "What? But I have ice racing studs!" True, you do, but the studs only work when they can make contact with ice. With the snow, the tire is on top of the snow, therefore, the stud is far from the ice. So, having tread allows you to get some traction in the snow. Blocky tread works best for installing the ice racing screws. I have found that you want to get a harder tire so that rubber doesn't move around during acceleration and braking on the ice. Snow tires get their traction by being very soft. If the tire blocks move around then the screw will move around and will work itself out. Find an inexpensive set of tires with a tall side wall (aspect ratio of 65+) and very narrow. Normally, for my road winter tires, I run 155-80-13. Since I couldn't find an all season tire that was that skinny, I went with a 165-60-13 to build my ice racing tires. And the tires MUST BE RADIAL!!! Why? The radial (the wire mess in the tire) is what helps to hold the screw into the tire. |
||||||
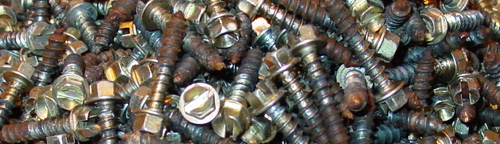
The next item you will need to purchase is a lot of ice racing studs. I installed 400+ per front tire and around 300 per rear tire. This is a total of about 1,400 ice racing screws that I had to install one at a time. Hindsight tells me that I put too many screws in each tire and that if I had installed fewer screws they would have performed better. The best place that I have found to purchase ice racing screws is Land-Air (7 Kellogg Rd, Essex Junction, VT 802-878-5052 ) The screws should be about 1-1/4" inches long. They need to go all the way through the tire. You will be able to see all the screws from the inside of the tire. |
||||||
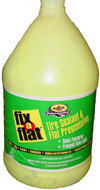
You will need a lot of liquid tire sealant. I used
a 1 gallon jug of Fix-a-Flat. Another brand is Tire Slime. Both of
these are corrosive to your rim, but I haven't seen any issues with
this to date. The purpose of the sealant is to apply it to each screw
before installation (seals the screw to the tire) and to fill (about
2 cups per tire) each tire with the sealant incase you either have
a leak or if you lose a screw. VALVE TOOL |
 |
|||||
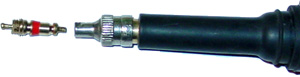
You will need a tool to remove the valve from the valve stem. The valve must be removed to inject the Tire Sealant into the tire. When inflating the tire, do not over inflate the tire with the thought that you can let some air out to get where you want to be. The tire sealant will to its job on its way out the valve.... and gum up the valve so it doesn't work |
 |
|||||
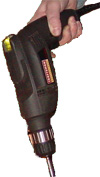
You will need a drill with a magnet tip nut driver to install the 1,000+ screws in your tires. I would also recommend that you have a standard hand nut driver to complete the installation. This will ensure that you don't over tighten the screws. The shoulders of the screw should be flush, or a hair below, the surface of the tire. Make sure to check the screws after you have driven your car on the ice. You can hand tighten the screws. Make sure you do not strip the hole during installation. Without the rubber and radial web, there is nothing to hold your screw in and you will be left with a tire you cannot use. AAA probably won't believe that you ran over 400 screws in the road. |
 |
|||||
It will take about 1 hour per tire to put all the screws in, inject the tire sealant, roll the tire around, install the valve, and inflate the tire. If you were able to put on screw in every 3 seconds, it would take 1,200 seconds or 20 minutes or 1/3 of an hour. 3 seconds per tire for the screws may work on the first tire, but you will be very tired before you get through the second tire. Let's move on to the actual installation..... |
||||||
| < Previous | Next > | |||||