|
|
|||||||||
 |
|||||||||
| < Previous | Building Ice Racing Tires (Stephen Jones) |
Projects | |||||||
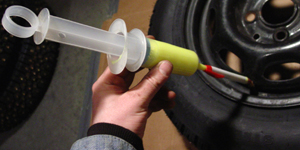
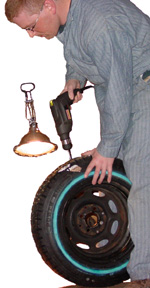
Plan. You have a pile of 300 or so screws that you need to put into a tire. The first thing that you will need to do is plan the pattern. Look at the pattern of the blocks of rubber and then decide how you would like to lay out the stud pattern. For example, the tire could have four rows of tread across the width of the tire, and perhaps the blocks of tread repeat ever 3 blocks. Time to start the stud installation. Get a cup or dish or some sort that you can discard when you are done with it. Put about 1/2 cup of the tire sealant in the cup. Dip each screw into the tire sealant. This does two things: (1) It is a lubricant and (2) it is a sealant. Apply steady and firm (not too hard) pressure when using the drill to install the screw. Don't use a screwdriver style bit.... use a nut driver. Do not over tighten the screw. The shoulder of the screw should flush with, or just slightly below, the surface of the tire. Do a 1 foot section at a time and then spin the tire around. This will help you with your pattern and make you feel like you are getting somewhere..... Make sure the tire is on a couple sheets of cardboard so that it is easy to spin around and will protect your floor. |
 |
||||||||
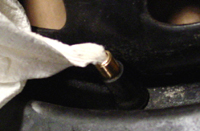
SEAL THE TIRE |
|||||||||
|
|||||||||
 |
|||||||||
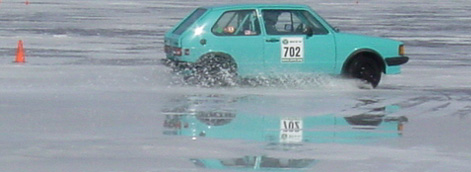
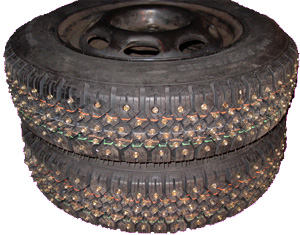
FINISHED PRODUCT Okay, you are done with all four tires for your car and should be ready to go ice racing. Don't drive these tires on the road since you WILL dull the points of the screws. The ice racing screws you just purchased at $25 per 500 are cupped. Drive on these sharpened screws and you will be left with dull screws... and wasted your investment. The day of your event, drive your car onto the ice and change to the ice racing tires there. Ice racing tires belong on the ice. Period. When driving on these tires, try to avoid locking up the wheels during braking. This will put a lot of pressure on the head of the screw and would make it more likely for one to be pulled out. |
 |
||||||||
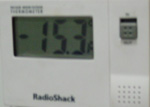
When the temperature has been below freezing for more than two weeks in early February, you can check the ice for safety. Personally, I like at least 8-10" of solid ice to drive my car. This is a lot more than what is needed according to some experts on the strength of ice, but this is what I feel comfortable with. |
|||||||||
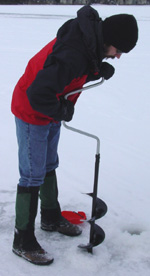
Br r r r r r.....
|
Test Hole
|
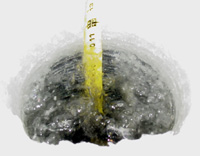
12 Inches of Ice!
|
|||||||
HAVE FUN AND KEEP IT SAFE Have fun and keep it safe. There are other vehicles (cars, trucks, snowmobiles) and people (skating, walking, skiing, and fishing) on the lake. Drive carefully. Be very careful if you have someone behind you when you are stopping. You will be able to stop a lot quicker than the vehicle behind you. The safest way to have fun on the ice is to set up an Ice Time Trail (ITT). An ITT is essentially an autocross on the ice, but with long corners. Make sure to mix up the corners... some corners that open up for the AWD folks and some with decreasing radius corners for the FWD and RWD cars. Use cones to mark off the area to keep people not involved in your event away from the course. Run only one car at a time and time each run with a stopwatch. Enjoy! - Steve |
|||||||||
| < Previous | Projects | ||||||||